You are viewing 1 of your 1 free articles. For unlimited access take a risk-free trial
Cyclists: position yourself for performance

Andrew Hamilton looks at recent research showing how cyclists can optimise their riding position for maximum performance
It’s hard not to be impressed by the exploits of the British cycling team. Another big medal haul at the 2016 Olympics shows that the ‘attention to detail’ philosophy originally pioneered by Dave Brailsford continues to reap rewards. Unsurprisingly, this attention to detail means that factors such as nutrition, training and bike technology are constantly placed under the microscope. But being an all-encompassing philosophy, this means that everything that could possibly affect performance is carefully scrutinised. And you can bet that among these factors is rider position.
Why is your riding position so important? Well, as all cyclists will (or should!) know, most of the energy expended on the bike is required to overcome wind resistance. An aerodynamic position that minimises wind drag is therefore critical to performance. But it’s not just about aerodynamics. A rider interfaces with the bike at three points: the handlebars, the saddle and the pedals. If anyone of these interfaces is biomechanically incorrect, the rider is likely to experience discomfort and even pain. An uncomfortable cyclist is not going to be a happy cyclist! But even worse, over time these biomechanical deficiencies can lead to chronic injuries such as knee and back pain. In this article therefore, we’ll look at the key principles of rider positioning – not just for performance, but for injury prevention too.
Handlebars
Apart from enabling a rider to execute safe and effective steering and braking, the handlebars serve another important role, which is to help provide support and stabilise the torso. Assuming your bike is fitted with handlebars that are the optimum width and depth (see box 1), the next most important adjustment to handlebar position is height. Handlebar height has a profound effect on your cycling efficiency; it not only helps to determine how ‘aero’ your riding position – it can also be a factor for cyclists who suffer from back pain.Box 1: Handlebar selection: width and depth
Before spending time optimising your handlebar height, it’s worth checking that the bars are correctly sized for your body. When bike manufacturers are deciding on the specification of each bike model – eg saddles, handlebars etc – the width of the handlebar (and the length of the stem) are typically selected as a function of frame size. For example, when it comes to width, the reasoning is that a taller rider will need a longer reach and will generally be wider across the shoulders. However, this assumes that everyone is the same build for any given height, which is obviously not the case.
If the bars are too wide, your shoulder blades are placed in a position that, over time, can cause neck pain and tension in your shoulders. Conversely, if they are too narrow, the hunched position can reduce diaphragm movement, thus restricting your breathing. Bars that are too narrow can also result in twitchy steering, which can be which can become tiring over the course of a long ride.
The rule of thumb is that the width of the handlebars from tube centre to tube centre should match the distance between the two acromioclavicular (AC) joints on each shoulder. The AC joints are the outermost parts of your shoulder bones and you should be able to feel the bumps where they protrude easily (see figure 1). However, this rule should be considered a starting point and not as written in stone.
Figure 1: Handlebar width

Centre-to-centre handlebar width should closely match your AC-AC joint width.
It’s not just handlebar width that needs to be considered. The geometry of the bars also needs to match your body dimensions and the kind of riding you do. The shape of the handlebar bend will also determine drop and reach (see figure 2), and this will feed into your required stem length and handlebar height setting. This is where the services of a professional bike fitter are invaluable. He/she can ensure that the dimensions of the bike are the best possible fit to those of your body.
Figure 2: Handlebar bend geometry and reach/drop
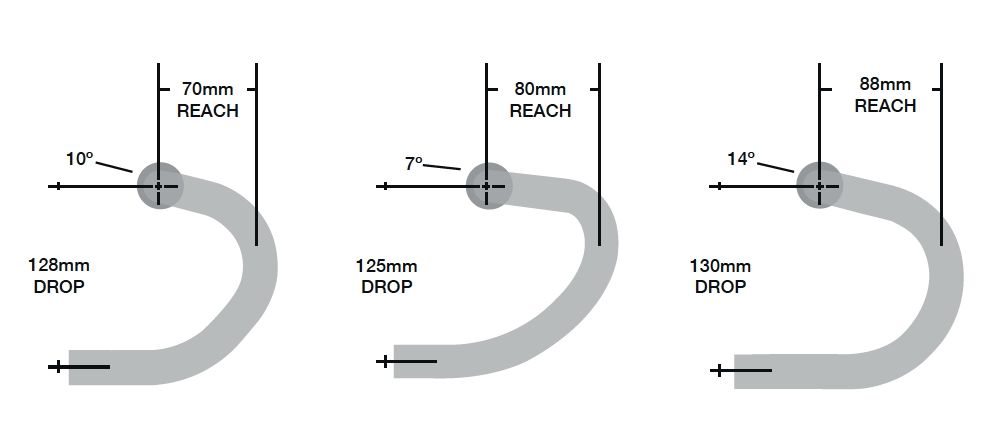
Subtly different geometries don’t just affect the way the handlebars feel in use, they also affect reach and drop, which can have a big impact on your optimum bike set up and riding position
Torso angle
Aerodynamic drag on the bike is strongly influenced by your torso angle. In a nutshell, the more upright your riding position, the higher the drag you’ll experience. Decreasing your torso angle (ie lowering the chest closer towards to handlebars and/or lowering the handlebar height) reduces drag, helping you to ride faster. You might think therefore that the best riding position is with your chest flat on the bars.However, as your torso angle decreases and your chest gets closer to the bars, the biomechanics of the human body means that power production in the thighs and buttocks become less efficient – ie it becomes harder to maintain the same power output. So when do the aero advantages of lowering your torso start to become outweighed by losses in power production, and how is this affected by your speed?
In an excellent study, scientists used computer modelling to predict how speed and torso angle affected the energy requirements of time trial cyclists(1). The models were fed with data collected from 19 time trial cyclists sitting at four different torso angle positions – 0 (horizontal), 8, 16 and 24 degrees (a more upright position), The results showed that at all angles, the aerodynamic gains outweighed the power losses only when cycling speeds exceeded 28.5mph, meaning that it’s better to get down low, even if that does make it a bit more difficult to produce power.
However, even at these high speeds, a completely horizontal torso was not the fastest, an 8-degree angle (see figure 3) producing even lower drag than horizontal. Conversely, for speeds below 18.5mph, a more upright riding position nearer to 24 degrees was preferred (figure 3 yellow angle). In this position, cyclists could maximise the efficiency of power production without paying too high a price in terms of drag.
Figure 3: Torso angle and cycling

The rider is shown riding near to the optimum 8-degree angle recommended for speeds above 25mph. This angle is shown by the intersection of the solid and dotted white lines, and is calculated by drawing an imaginary line from the centre of the shoulder to the hip. The yellow angle is closer to 24 degrees, a good compromise for optimising cycling power and efficiency when riding under 18.5mph. For speeds in the range 20-25mph, the best riding position varied according to the event: in a steady state endurance event a small torso angle was better; in sprinting or in variable conditions (eg windy or an undulating course) where more power is needed, a more upright position was better. In summary then, the most efficient riding position is not necessarily as low as possible, especially at lower speeds. This is obviously great news if you find extreme aero positions uncomfortable – and something to bear in mind when setting your handlebar height.
Handlebars – theory and practice
The theory of optimising your handlebar height and torso angle to maximise riding power and speed is all well and good, but riding in an optimum aero position isn’t always plain sailing. Getting down low (close to the magic 8% torso angle on drop handlebars) can be quite uncomfortable to maintain during longer events. Dedicated time triallists and triathletes often get round this by using aerobars. These place the cyclist in a position where the trunk is flexed forward and the elbows are close to the midline of the body - a position known to improve cycling aerodynamics. However, while aerobars do provide aerodynamic advantages, some research suggests that there are drawbacks to their use too because they can impair your breathing efficiency.In one study, scientists investigated the respiratory effects of using aerobars in eleven endurance trained male cyclists(2). In particular, they wanted to find out whether the low riding position on these bars affected the respiratory muscles’ ability to function efficiently (to open up lung volume and draw in air). They also wanted to discover if there were any knock-on effects that could affect performance.
All the cyclists underwent three separate bouts of cycling in the lab at 70% of their peak power output (hard). However, the position they adopted varied in each trial: in one trial, they positioned themselves on aerobars; in another they used the drops of conventional handlebars; in the third, they rode more upright while grasping the brake hoods. The cyclists’ metabolic and ventilatory responses were measured in all three trials and a special device was used to measure the pressures generated in the diaphragm.
The main finding was that compared to an upright position riding on the hoods, the aerobar position significantly increased the work of breathing and the ‘ventilatory equivalent’ for oxygen and carbon dioxide. In plain English, this meant that in order to breathe in a given amount of oxygen (to fuel exercise), their respiratory muscles had to work harder and more rapidly – an effect the researchers described as ‘ventilatory inefficiency’. Moreover, this inefficiency was strongly correlated to the degree of thoracic restriction. In the aerobar trial (elbows narrow) the chest was restricted, whereas in the handlebar and brake hood trials, there was less restriction and less drop in ventilatory efficiency.
So, while you’ll gain aerodynamic efficiency using aerobars, your breathing efficiency will drop compared to a more upright position, especially aerobars where the elbows are placed in a narrow position. Overall, the gains of adopting an aero position are still potentially large enough to outweigh any respiratory drawbacks, but this is yet another factor you need to bear in mind when choosing and adjusting your handlebars to optimise your riding performance.
A pain in the back
Another factor influencing your optimum handlebar height/position is your lower back and pelvic flexibility. That’s because riding in a ‘low’ position places considerable demands on this region of the body – if these demands are too high, the result may be back pain. The total reach of the rider from the seat to the handlebars is called the virtual top tube length. Lower handlebar heights increase this reach distance.As a rule of thumb, reach is optimised when you can’t see the front hub (because it is obscured from view beneath the handle bars) while riding in the drop handlebar position. In this position, elbows should be bent 65° to 70°. The distance from the elbows to the knees should be two and a half to five centimetres at the top of each pedal stoke. With hands comfortably placed on the brake hoods, a plumb line dropped from the nose should intersect the bicycle stem.
Crucially, the forward ‘lean’ required to achieve this reach should come from the pelvis rotating at the hip, rather than flexing (bending) the back (which should remain as straight as possible – see figure 4). For most riders, setting the handlebars lower than four centimetres below the seat height greatly increases pressure on the low back unless the rider is extremely flexible and able to rotate his or her pelvis forward to quite a large degree(3). While improving your pelvic flexibility and forward tilt is a good thing, there are knock-on implications for saddle design (see box 2)!
Figure 4: Pelvis rotation and lower-back flexion

In order to obtain the optimum ‘reach position’, the pelvis should rotate forwards (shown by the red angle). Flexing the lumbar region of the lower back (purple shaded area) to obtain this reach, increases the risk of lower back pain.
Box 2: Pelvic tilt and saddle design
Riders who seek to develop better pelvic flexibility might need to consider their saddle design. While tilting the pelvis forward at the hips, rather than flexing the lumbar spine, decreases the strain on the lower back, it increases the pressure on the perineum. The perineum lies just below a sheet of muscles called the pelvic floor muscles, which support the bladder and bowel. The perineum region is sensitive and vulnerable to injury because it contains blood vessels and nerves that supply the urinary tract and genitals with blood and nerve signals.Cumulative injury to the blood vessels, nerves, and muscles in the perineum - particularly for those cyclists spending many hours in the saddle - can lead to various urogenital complications such as bladder control, sexual problems and erectile dysfunction. Narrow saddle designs, especially lightweight saddles with minimal cushioning, resulting in high amounts of pressure on the perineal region, increasing the risk of injury. A poorly designed or adjusted saddle (that increases pressure and discomfort on the perineum) will therefore make it harder for riders to achieve greater pelvic tilt, which in turn increases the risk of back pain.
In a US study, researchers at Utah State University investigated whether cyclists could achieve a greater pelvic tilt while riding, without increasing pressure on the perineum - by using a ‘kinder’ saddle design(4). Twenty female volunteers rode a stationary bicycle ergometer using three different saddles: a standard, a partial cut-out design (figure 5) and complete cut-out design (figure 6). Subjects rode on each saddle for four minutes with their hands on the tops of the handlebars and four minutes with hands in the drops. The pelvic angle and trunk angle were recorded while on each saddle. The results showed that both the cut-out design allowed the riders to achieve a greater pelvic while simultaneously decreasing pressure on the perineum.
Figure 5: Partial cut-out saddle design

The V-shaped groove (under the perineum when cycling) reduces perineal pressure.
Figure 6: Complete cut-out design

An extension of the V-shaped grooved design.
Another strategy to help increase pelvic is to use a small degree (10-15 degrees) of downwards saddle angle tilt (ie where the saddle nose is lower than the rear). Israeli researchers found that tilting the saddle angle downwards by 10° to 15° increased the pelvic angle and decreased the forces at the lumbar spine and pelvis(5). When tested on 40 cyclists in the field over a 6-month period, the downwards tilting saddle position resulted in a significant drop in the incidence of back pain. Moreover, those who were still experiencing pain reported a significantly decreased incidence and intensity of pain. Although back pain often resolves in time anyway, these results are more significant because fluoroscopy scans of the cyclists also showed that tilting the seat angle by 10-15 degrees increased the pelvic angle, and decreased the forces at the lumbar spine and pelvis.
Saddle height and setback
Setting optimum saddle height is a relatively straightforward and well-understood procedure. However, another adjustment that needs to be considered is ‘saddle setback’. Setback refers to the forwards/backwards position of the saddle in relation to the seatpost. The conventional advice is that with the balls of the feet on the pedals and the pedal position adjusted so that they are in a horizontal position ie. at 3 o’clock and 9 o’clock, a vertical line dropped from just behind the kneecap on the outside of the forward knee should pass through the axle of the pedal. However, recent suggests that a slightly different approach might be needed.In this study, scientists set out to investigate the influence of saddle setback on pedalling effectiveness by looking at how efficiently the cyclists were able to generate force through the pedals, and how efficient they were at sustaining a constant workload(6). Eleven cyclists were assessed in six saddle setback positions while pedalling at a steady power output of 200 watts at a cadence of 90 rpm. A force sensor was integrated within the seat post to compute the centre of pressure on the saddle, and pedals with force sensors were used to calculate how efficiently the force applied to the pedal was converted into crank force (ie the force needed to drive the bike forwards).
The results showed that in terms of force and steady-state pedalling efficiency, sitting further back from the standard resulted in gains of around 2% - ie less muscular energy was required from the cyclists to maintain a 200 watt output. Also, in comparison with a more forward setback position, sitting backward significantly decreased (by 5%) the cumulative total work performed by the cyclists. This fits with previous research showing that sitting more forward favours maximal power output – useful for sprint cyclists, and almost certainly the kind of position that cyclists on the track are using.
Foot-on-pedal position
Correct cleat position on the shoe/pedal system setting is vital for reducing the risk of knee injury. The angle of the cleat on the shoe (ie whether the foot points straight ahead, slightly in or slightly out), the fore/aft position and the width position (ie whether the cleat sits along the midline of the shoe or towards the inside/outside) are all important factors to consider.As a rule of thumb, the cleat position should accommodate the natural orientation(s) of the feet when observed off the bike – eg when performing half squats. In particular, if the angle of preferred foot orientation (toes in/toes out) changes noticeably during activities that involve bending and straightening of the knee, pedals allowing a small amount of ‘cleat float’ (ie foot rotation while on the pedal) are advised. This freedom of movement helps reduce torsional stresses at the knee joint. Note too that optimal cleat settings may differ from foot to foot as few people are perfectly symmetrical!
For most cyclists using pedal with some cleat float, setting a fairly straight-ahead angle, with the balls of the feet over or a couple of millimetres forward of the pedal spindle is a good starting point. However, those with a history of knee injury or foot discomfort while cycling are strongly advised to seek the services of a bike-fitting specialist. He/she will be able to analyse your individual biomechanics and movement patterns to come up with more precise guidelines.
Finally, some cyclists have speculated that different foot positions on the pedal – specifically placing the foot further forward than the ‘balls of the feet on the spindle’ position – could help improve cycling efficiency and reduce energy costs. However two different studies on racing and competitive cyclist have investigated this topic and found that there was absolutely no advantage in moving the foot forward – either in terms of cycling efficiency or outright performance(7,8). It is therefore recommended that cleat position is set purely to ensure comfort on the bike and to avoid injury!
Summary and practical recommendations
Let’s summarise the main points in this article and see how they translate into practical recommendations for cyclists seeking optimum positioning on the bike:Handlebar positioning
- Make sure your handlebar geometry is suited to your body dimensions and riding; don’t assume that the standard bars supplied by the manufacturer are right for you. Swap them out for different bars (seeking advice from a professional bike fitter) if needed.
- Be prepared to adjust handlebar height for different events. For short time trials where maximum speed is essential, lower the bars to allow approximately 8 degrees of torso angle. For longer, slower events like endurance sportives, or for more recreational cyclists, you can raise the bars slightly to allow for an effective but more comfortable 24-degree torso angle.
- Aerobar users should be aware that an excessively narrow elbow position will reduce breathing efficiency. All cyclists using low riding positions can benefit from inspiratory muscle training (IMT) using devices such as PowerBreathe.
- Riders who experience low back pain, especially when riding low, should work on increasing pelvic flexibility and tilt (there are a large number of tutorials online.
- Try adding yoga or Pilates to your cross training to both increase pelvic flexibility and core strength. Remember to use any flexibility you acquire and change your habitual riding posture.
- If you don’t have a coach or riding club, have a friend video record you on a trainer. Evaluate your posture and work to increase the bend at the hips and flatten the low back
- To encourage riders to ride with more pelvic tilt, a slight downwards saddle tilt of around 10 degrees may help, as will cut-out saddles, to reduce pressure on the perineum.
- Optimum saddle height is best set using the knee angle method and with the help of a professional. Evidence suggests that around 25 degrees away from straight is best for efficiency and injury-risk reduction, although this should be considered a starting point – not an absolute.
- Be prepared to adjust your saddle setback from neutral; in short time-trial events where power production is vital, you can bring the saddle forward a little. For long endurance events where cycling economy is the goal, it can come back a little from neutral.
- Your cleat and shoe position should be set to maximise comfort and minimise injury risk. There are no performance gains to be had from moving your foot forward (or backwards) on the pedal.
- Try to allow for a cleat position so that your foot movement during pedal rotation mirrors that which occurs off the bike when blending and straitening the knees.
- Allow for limb asymmetry. Set up each cleat separately – don’t set up one then simply duplicate the left/right settings.
- Cyclists with history of riding injury are strongly advised to invest in advice from a professional bike fitter. This is particularly true for shoe/cleat/pedal set up.
- J Biomech. 2014 Mar 4. pii: S0021-9290(14)00140-7
- Med Sci Sports Exerc. 2017 Jul 31. doi: 10.1249/MSS.0000000000001393. [Epub ahead of print]
- Sports Performance Bulletin 2010. Issue 285 p5-7
- Med Sci Sports Exerc. 2003 Feb;35(2):327-32
- Br J Sports Med. 1993;33:398-400
- Sports Biomech. 2016 Nov;15(4):462-72
- J Biomech. 2007;40(6):1262-7
- Int J Sports Physiol Perform. 2009 Dec;4(4):517-23
Newsletter Sign Up
Testimonials
Dr. Alexandra Fandetti-Robin, Back & Body Chiropractic
Elspeth Cowell MSCh DpodM SRCh HCPC reg
William Hunter, Nuffield Health
Newsletter Sign Up
Coaches Testimonials
Dr. Alexandra Fandetti-Robin, Back & Body Chiropractic
Elspeth Cowell MSCh DpodM SRCh HCPC reg
William Hunter, Nuffield Health
Keep up with latest sports science research and apply it to maximize performance
Today you have the chance to join a group of athletes, and sports coaches/trainers who all have something special in common...
They use the latest research to improve performance for themselves and their clients - both athletes and sports teams - with help from global specialists in the fields of sports science, sports medicine and sports psychology.
They do this by reading Sports Performance Bulletin, an easy-to-digest but serious-minded journal dedicated to high performance sports. SPB offers a wealth of information and insight into the latest research, in an easily-accessible and understood format, along with a wealth of practical recommendations.
*includes 3 coaching manuals
Get Inspired
All the latest techniques and approaches
Sports Performance Bulletin helps dedicated endurance athletes improve their performance. Sense-checking the latest sports science research, and sourcing evidence and case studies to support findings, Sports Performance Bulletin turns proven insights into easily digestible practical advice. Supporting athletes, coaches and professionals who wish to ensure their guidance and programmes are kept right up to date and based on credible science.

